One of the most loved and trending characters is Sonic the Hedgehog. You also want to know How to draw Sonic the hedgehog and learn the step by step process to draw Sonic the hedgehog. You are in right place. Here we are going to explain to you the process of How to draw Sonic the hedgehog. draw Sonic the hedgehog Step by step search will be fulfiled in this Blog.
Sonic the Hedgehog is a video game series produced by Sega. The protagonist of this series is an anthropomorphic blue hedgehog named Sonic, whose peaceful life is often interrupted by the series’ main antagonist, Doctor Eggman.Blue arms with white gloves and red shoes… Oh I see! He’s half robot! How many fingers does he have?
Table of Contents
How to draw sonic the hedgehog
Sonic is one of the most famous game characters ever created. And he’s still around today… (that was meant to be epic, but it wound up more like a question…)
For those new here on Newgrounds, I’m I Can Haz Cheezburger , Jonathan Adams . This will be somewhat of an ongoing art series, but with a twist. I will be producing these in the style of my previous art series “The Art of Animal Characters”, which you can find here . It was very well received on Newgrounds, so I thought I’d bring it back for this character…
I don’t want to get into why Sonic sucks or anything like that. This is simply an art tutorial on drawing Sonic. It will be split up into multiple parts, which will come out every week until the whole thing is done. This first part will show you how to do all of his details and highlights (or shadows depending on the light), as well as eyes and hands:
I use a Wacom Bamboo tablet for all of my drawing. I know there are a lot of other opinions regarding which tablets artists should use, but so far it’s been great to me and I recommend Wacom as the best option because they have been in business for so long and provide an excellent service.
All of the images below were created at 100% size. When you print them out, remember to not only change the size but also make sure “Print Background” is unchecked (otherwise you’ll get a white box behind your drawing).
Also, I like to use pretty high resolution when creating my drawings. If they’re too large for ya, go into Photoshop’s Image Size and shrink it down.
You can easily restore the image to its orginal size by CTRL+clicking (or right-clicking if you’re on a Mac) on the layer titled “Background”.
While I always recommend using paper and pencil to draw your sketches, I’ll be using Photoshop in these tutorials because it’s what I’m most familiar with. It can be done in any program though…
Well, now that I’ve blabbed enough (and because you’re getting tired of all my ‘splaining), let’s get to the drawing! 🙂
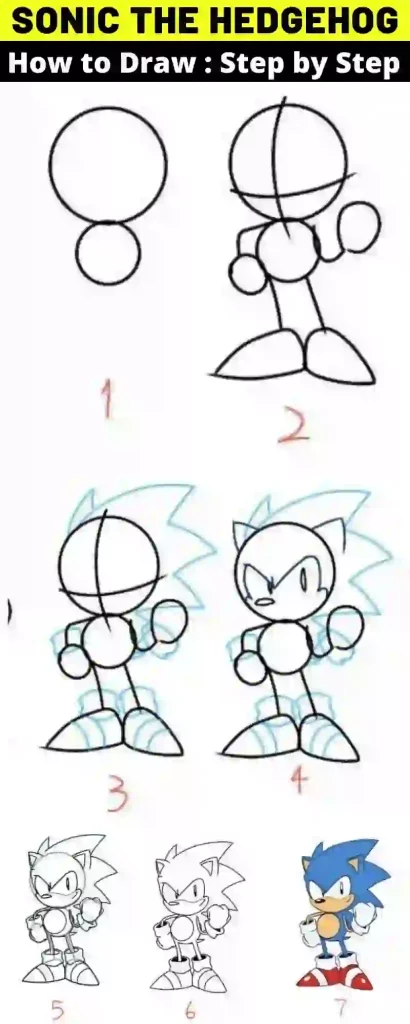
STEP ONE to draw Sonic the hedgehog: The head shape
Remember that this is Sonic running, so he’ll be moving fast. His head should be stretched out and low.
For his spikes, we’re going to use the Line tool (which is next to Paint Bucket Tool). If you need help with this, check out this tutorial .
To create an outlined cap at the top of his head:
1. Create a new layer above your sketch layer and set it as “Overlay”. This will be the shading layer.
2. With the Line tool , draw a line like in #1 and #3 below:
3. Draw another one like in #2 and #4 below:
4. Then draw one more like in #5 and #6 below:
5. Duplicate that last shape we made for his quills (the one on its own) and move it below the one we made before.
6. Make another filled in shape like in #7 and #8:
7. Repeat that same process on the bottom of his head, making a line followed by two more lines above it, then duplicating it and placing them both underneath each other:
How to draw Sonic The hedgehog Video
STEP TWO draw Sonic the hedgehog: More details on his head and face
Doing this will help you better picture what part is where while drawing Sonic. And no matter how much I try to draw these things freehand, I always find myself going back to these guides when something’s off… Anyway, for this step we’ll add more detail on top of our sketch layer. It doesn’t need to be perfect since this is just for reference (and because no one will be seeing it on a person’s profile).
1. His muzzle:
2. Two lines under them to make little circles for his cheeks:
3. And two on either side of those, making the shape of his mouth:
4. Now let’s add some shading (and spending some time here will help you later on when we start adding shadows/highlights):
5. This is Sonic without his eyes and irises, which we’ll draw next:
STEP THREE draw Sonic the hedgehog: More detail work on the head
The shapes are all there, but they need more detailing before moving onto his crescent-shaped ears. I’ll also show you how to do that really cool fur texture that appears in this game.
1. First, let’s draw the little triangle shapes over his cheeks:
2. The ears don’t have to be perfect because they’ll look better once we shade them later on (like I mentioned before). Just make two filled in triangles like so:
3. And lastly, let’s add the texture lines within the quills of his head/back/spikes (I’m not sure what it is he has):
STEP FOUR draw Sonic the hedgehog: Shading! (Work in layers)
Looks like there was quite a bit of shading that needed to be added, huh? Well here you go… But since this is part one, I won’t explain all of my steps…’ll just have to trust me that I know what I’m doing 😛
1. Start by making a new layer above your sketch layer and set it as “Multiply”. I’ll be using this one for shading.
2. Depending on which areas you want to shade, make a “Shading” layer directly above the color(s) you want to shade them with (in my case, Sonic’s head). However, if you want the same shading on every part of whatever you’re shading, make a stamp visible by CTRL+clicking or Right-clicking where all those parts intersect.
3. If there are multiple shading layers that have parts overlapping each other, simply select all those parts and merge them into one using Pathfinder . Once everything is merged, make a new layer above your shadow layers and set it to “Multiply” (in my case, I only had the one shading layer for his head).
4. Now with the Pen Tool (no shortcut), draw a line over your contour lines making sure to follow them exactly. This will create a subtle effect of Sonic’s fur poking out from under his hat:
5. Then take the Line tool again and draw thin lines sticking out from under his quills on top of that shadow. The trick is to use small strokes so it looks more like texture 😛
6. If you want to add some extra light/shadow touches, this is where you do it . It also helps if you zoom in when you’re doing this.
7. You can also add more detail on his head/ears/mouth with the Line tool . I drew in little rounded triangles for Sonic’s cheeks and added long lines in between each of his quills with a 2 pt Stroke Weight .
8-10. Then, create a new layer above your “Shading” layers (in my case, it was above all my other layers) and set it to “Multiply”. This will be where we do any shading with strokes/glows/etc… using dark colors. I’ll show you what I mean in the next step…

STEP FIVE draw Sonic the hedgehog: Shadows & Highlight! (Work in layers)
And here’s where everything starts to come together.
1. First, draw a black stroke over the lines you want to shadow or highlight using your Stroke Weight , Brush Size , and Opacity (%) as reference. It won’t look good being too dark/light at first, but we’ll fix that later on…
2-3. Make a new layer above your “Shading” layers (in my case, it was directly above everything because I only had one file) and set it to “Multiply”. Then select all of Sonic’s parts without his eyes/bands with the Rectangular Marquee Tool and make a new layer from them . Fill those selections with white then lower their Opacity to 15% . Afterwards, copy & paste your selections and rotate them slightly while flipping them vertically .
4. Copy & paste your white parts to a new layer and place it below the rest of your rectangles/shapes. Now with the Pen Tool (no shortcut), draw a black stroke around all of Sonic’s bottom parts (his band, shoes, tail, etc…) making sure you follow their contour lines exactly.
5-7. Create a stamp visible by CTRL+clicking or Right-clicking where all those parts intersect then make a new layer above your “Shading” layers (in my case, directly above everything because I only had one file). Then set this layer to “Luminosity”. This will be where we add any highlights using light colors. Now select all of Sonic’s top parts with the Rectangular Marquee Tool and make a new layer from them. Then fill those selections with white and place it in a new layer below your blacked out rectangles/shapes from step six.
8-9. Do the same thing you did when you shaded his fur, but this time add white strokes sticking outward from under each quill using a Stroke Weight , Brush Size , and Opacity (%) as reference .
10-11. All that’s left is to add some light touches on his face & chest using a low Opacity white brush over any contour lines 😀
STEP SIX draw Sonic the hedgehog: FINAL TOUCHES! (Work in layers)
And here we are, at the final stretch! This is where you add any extra little touches to Sonic’s face and costume. Make sure to use a very low opacity for this so it doesn’t stand out too much.
Draw Sonic The hedgehog Video : Step by step Process Video
Draw sonic the hedgehog Step by Step
Step by Step Instructions on how to Draw Sonic the Hedgehog, Drawing tutorials for kids and beginners will show you how easy it is to learn to draw your favorite Disney Characters!
- a) First, we will start with the head and draw an oval shape.
- b) Draw a horizontal line. This is to indicate where the eyes will go.
- c) Continue adding lines for the nose and mouth as shown in the image below.
- d) Continue drawing Sonic’s head as shown below:
- e) Next, we will draw the arms.
- f) Now, we will proceed to draw the body of Sonic. Draw a wavy line as shown in the image below. This will be a guide for the flower pattern that he is wearing.
- g) Next, we will draw his shirt and shoes which are both green in color. The shoes have a white front and a red buckle.
- h) Now, let’s draw Sonic’s spiky hair! Draw the top part of his hair with small pointy spikes coming out of it. Give him some loose strands of hair at the sides for that funky look
- i) Continue drawing Sonic’s face as shown below:
- j) Next is Sonic’s long and pointy ears! Draw a triangle shape as shown below.
- k) Now, let’s draw Sonic’s hands by first drawing his fingers. Finish off the hand by drawing a circle at the tip for his nails.
- l) Finally, we will draw Sonic’s feet! He has huge white shoes with red buckles on them. Draw it as shown below:
- m) Well done! You have now finished drawing Sonic.
Did you like this tutorial? Check out some more tutorials on how to draw your favorite Disney Characters.
Learn how to draw your favorite Disney Characters step by step with our easy tutorials, including full video lessons! Kids and beginners alike can now draw their favorite Disney characters at home (Mickey Mouse, Donald Duck, Goofy) or on the go (Sonic the Hedgehog). The best part about these tutorials is that you don’t need any fancy drawing equipment! Just print out our free pages to get started, grab some pencils and start learning how to draw. What are you waiting for?
Thanks for reading these step by step tutorials on how to draw Sonic the Hedgehog. You can check out our homepage for more drawing lessons, including these tutorials. If you have any doubts, Do comment below and we will make sure to solve them as soon as possible. We Are always happy To Help. Have a Nice Day
Before you leave, You can also Read,
- How much are Billie Eilish tickets
- Spotify Wrapped 2021 error
- 9now Love island vote Australia
- How to vote for Bigg Boss OTT
- IPL 2021 Channel | IPL 2021 live
- Dear moon application form
- How to watch The Bachelorette
- Twirl Future
- 9xFlix [ 9xFlix.com , 9xFlix website
- 9xmovies -9xmovies win
- HINDI Web Series Download
- BollyFlix [ BollyFlix Bollywood
- MoviesFlix Pro [ moviesflix verse]
Source: The images used in this article have been taken from the internet and are assumed to be in the public domain.